Veloharmony bike fit guide
It all begins with fit. To get faster in cycling, your bicycle must be comfortable.

This video library has what you need to start your diy online bike fit.
No fit can fix a bike that’s fundamentally too small or large for you.
Make sure you get a bike sizing before buying your bicycle or to confirm that your bike is within the parameters need to fit you.
Your Saddle height based on your inseam, Saddle fore-aft after setting your saddle height, properly placing your cleats to utilize the widest area of the ball of your foot, having the correct handlebar width and reach to properly dial in your cockpit are the primary aspects to consider when setting up your bicycle.
You will need additional help, getting the connection points of your body, the hands, feet and pelvis properly aligned with your bicycle. This is only the beginning of a dynamic Houston bike fit. Not only do these points need to be in the correct area, but each must be fine tuned to the specific connection.
The assessment of each part must be fine tuned to its connection point with your body. Why? The bicycle is symmetrical, but the human body is not, hence a dynamic bike fit is best. You need to consider all the variances between the angle of your stem, bar tilt, drop, saddle height, saddle tilt & etc.
Professional Assistance
The videos in the online fit guide vlog below, cover all aspects for performing your very own bike fit without the help of a professional. If you find that you have exhausted this resource and still need help, Contact us for a comprehensive fit whether you are local or not. We have local houston bike fit and remote bike fit services for riders that are not able to come to our studio for an in-house bike fit.
Pedal cleat placement
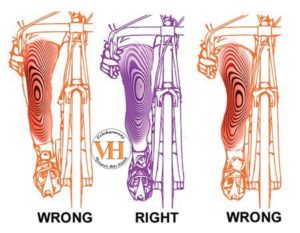
The first point of contact we setup at Veloharmony is the cleat position on the shoe to ensure a proper and comfortable transfer power to the bicycle. If the cleats are not properly position, then even saddle comfort is compromised and your bike fit guide would be remiss to exclude this.
DIY Bike fit Guide
- Setup your cleats
- Measure your cycling inseam
- Set your Saddle Height
- Set you Saddle foreaft Position
- Setup your cockpit
These steps will get you further than when you first got your bicycle, but a professional fitter is more thorough than any diy bike fit guide, and can eliminate any niggling issues remaining after your DIY bike fit setup.
Professional bicycle fitting is an emerging science that combines cycling fundamentals with the fields of biomechanics and physiology. In other words, you can’t just eyeball the seat height, throw on a pair of shoes and take off.
Handlebar reach and width are key to bike comfort in any bike fit guide
In our studio we focus on what most fitters tend to ignore:
- the correct length and angled stem
- right shape and size of handlebar
- the proper bar tilt/rotation
- the correct location of the brake levers on the handlebars
- Correct cleat fore/aft position and its rotation, tilt and stance width
Our ultimate result between the bike and your connection points is to make the bicycle disappear. Once you no longer notice the bike and the only thing on your mind is your ride, the scenery, and/or company, then you have a good fit.
Similarly, while a bike racer may not care about the scenery, they do care how fast they are going and their position in the field. When a bike racer is not conscious about their bike (it disappears) they are experiencing a proper bike fit.

-

Road Cycling Cleats - How to Set Up Cleats for Clipless Pedals without KOPS
-

How to setup cleats for clipless pedals
-

Cycling Measure Inseam - Confirming Inseam measurement
-

Saddle Height Road bike - Tips for getting it Right and why it's important
-

Saddle Fore Aft position Setup - Bike Fit
-

Road handlebar width - Choosing the right handlebars for your Road bike
-

Road handlebar setup - Setting your drop handlebars for road cycling | fit and setup handlebars
-

Resolving Handlebar setup Issues
-

Frankie's TT Fit
-

Pilunga's Scattante Road bike Fit
-

Carlo's TT Fit
-

Record your current position on the the Bike - Bike Fit


